![]()
![]()
![]()
![]()

![]()
![]()
![]()
![]()
![]()
![]()
![]()
![]()
![]()
![]()
![]()
Creating
immersive panoramas :
a "cookbook" approach
-Part 3-
5.- Running the optimizer.
Open at least one image so that Photoshop's
filter menu is active, then start Panorama Tools adjust tool
:
Filter Menu / Panorama Tools / Adjust.
Select the
options "Run Optimizer" and "Use Script"
then click on the Browse button to select your script file.
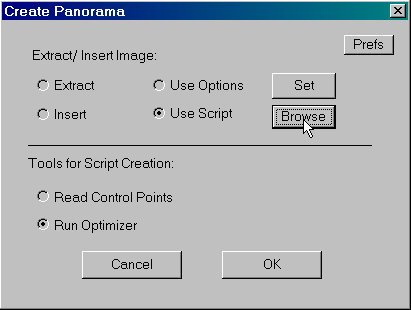
Press OK. A window will open, telling you about the optimize process. Look at the average difference between control points, it gives you an estimate of the fitting between images, thus of the quality of the generated panorama. Since this average is measured in the final image, it depends on the dimensions of your panorama. The important figure is thus the ratio between the average difference and the panorama width.
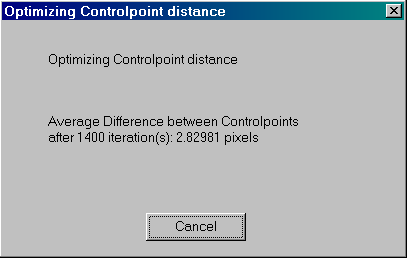
Average difference / Panorama width |
Quality of stitching |
< 0.05 % |
Excellent. |
< 0.1 % |
Correct. Should give you a good panorama with minor retouch. |
< 0.5 % |
Poor. May be caused by problem in shooting (parallax error because you didn't rotate around the nodal point) or by a mistake when typing in control points coordinates. |
> 1 % |
Very poor. Indicates you probably made a mistake when typing in control points coordinates. |
When the optimizer finishes its job, it opens
an updated script file
with Notepad. This script file contains the three command lines
needed by Panorama Tools to stitch the three photos :
o f2 r0 p0 y60 v183.221 a0.000000 b-0.045967
c0.000000 -buf
o f2 r-1.65003 p0.911509 y167.283 v183.221
a0.000000 b-0.045967 c0.000000 +buf -buf
o f2 r0.785092
p2.50611 y-71.4973 v183.221 a0.000000 b-0.045967 c0.000000 +buf
These contents of these command lines is similar to that of the i-line except that this time the parameters values are modified to make the photos fit together. You can control the values : the horizontal field of view (v parameter) around 185° and distortion (b parameter) around -0.05 for the Coolpix fisheye.
If you want to be able to fine tune the seams
with Photoshop (recommended !), remove
the -buf / +buf parameters at the end of each command line.
In this way, Panorama Tools will not perform the stitching itself
but instead will generate a Photoshop file with a layer associated
to a transparency mask for each photo. You will then be able
to modify each image separately to adjust colors/brightness
to better match its neighbors, or modify the mask to adjust
the position of the seams and control blending between images.
The final script (with "buf" references removed) is
here. Don't forget to save the script
file after the modifications...
6.- Stitching the images
Open the first image (the image numbered 0 in
the script), then start Panorama Tools adjust tool :
Filter
Menu / Panorama Tools / Adjust.
Select the options "Insert"
and "Use Script" then click on the Prefs button (your
script file should have been remembered - if you are not sure,
re-select it with the browse button).

In the window that opens then, select only option (b) : Save full sized result to file and enter the name of the panorama. It will be saved in the same folder as the script file. Be careful if you use the browse button : Panorama Tools (V 1.9.2) doesn't put quotes around the name of the file. This will cause problems if the path contains spaces.
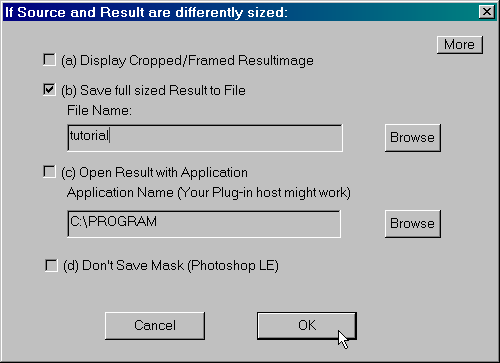
The (d) option : Don't save mask (Photoshop LE) should not be checked if you have Photoshop LE 5.0. The support for masks in 5.0LE is minimal but quite usable as you will see later. |
Press OK on both windows - voila, the first image is inserted in the panorama as layer 1. Close the first image (this preserves memory), don't save it. Open the second image and start again the stitching (you can this time use the shortcut Ctrl-F). Repeat for the last image.
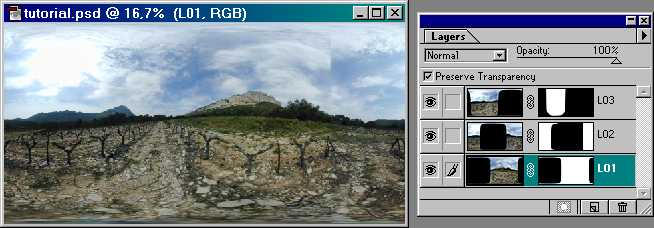
Now you can open and admire your panorama ! It should look like this :
![]()
![]()
![]()
![]()
![]()
![]()
![]()
![]()
![]()
![]()
![]()
![]()
![]()
![]()
![]()